Ultimate Guide for SAP Single Sign-On: Simplest Method to Enable SAP Single Sign-On
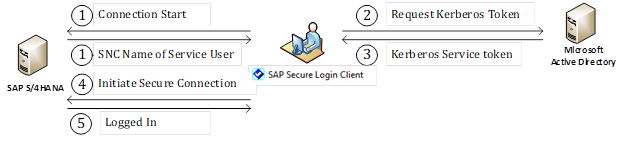
The SAP Single Sign-On (SAP SSO) product enables users to log in to SAP without entering any password. If you have SAP in your inventory, I recommend enabling SAP Single Sign-On from the day one of SAP Go-Live. If you didn’t enable yet, no worries, don’t wait to set up and continue reading. Audience: People […]
Step 1: Create an Active Directory Service Account for SAP Single Sign-On
If you directly started reading from page, please consider starting from here. Ultimate Guide for SAP Single Sign-On: Simplest Method to Enable SAP Single Sign-On The best practice is to create an active directory account per SAP system id (SID). Create a normal user account in Active Directory. Best practice format for account svc_sap_sso_. Replace […]
Step 2: Configure SAP for SAP Single Sign-On
If you directly started reading from the page, please consider starting from here. Ultimate Guide for SAP Single Sign-On: Simplest Method to Enable SAP Single Sign-On. Log in to the SAP system Run t-code SNCWIZARD, SAP Single Sign-On Wizard will start. Click continue On Default Profile Parameters screen, the transaction will assign changed values by […]
Step 3: Installing SAP Secure Login Client software to client PC
If you directly started reading from the page, please consider starting from here. Ultimate Guide for SAP Single Sign-On: Simplest Method to Enable SAP Single Sign-On. Installing SAP Secure Login Client on the client laptop Login to SAP Support Portal, https://launchpad.support.sap.com/#/softwarecenter Select “By Alphabetical Index (A-Z)” and then select “S” Select and download SAP SINGLE […]
Step 4: Configure an SAP User Account for SAP Single Sign-On – User SNC Mapping
If you directly started reading from the page, please consider starting from here. Ultimate Guide for SAP Single Sign-On: Simplest Method to Enable SAP Single Sign-On. Run the t-code SU01 (Maintain Users) Click SNC tab and paste Kerberos token to SNC name field. Format for SNC Name is p:CN=ADUSERNAME@YOURDOMAIN.COM (If you need help, refer to […]
Step 5: Change SAP System Logon Settings for SAP GUI
If you directly started reading from the page, please consider starting from here. Ultimate Guide for SAP Single Sign-On: Simplest Method to Enable SAP Single Sign-On. Activate Single Sign-On within SAP Logon (Activate Secure Network Communication) On SAP Logon app, right-click single sign-on enabled SAP system and select properties On Network Tab check Activate Secure […]